Introduction
Your djangify.com store comes with a free subdomain (e.g., yourstore.djangify.com), but you can connect your own custom domain at any time.
This guide shows you how to connect your own custom domain (e.g., yourdomain.com) so customers see your brand name in the URL.
Your domain is updated via the my.djangify.com portal. Your login details were sent in the welcome email you received.
Log into your Customer Portal
Visit https://my.djangify.com/portal/login/ and navigate to the Custom Domain tab.
Enter Your Domain
Type your domain without http:// or www.:
-
Correct: myshop.com
-
❌ Wrong: https://myshop.com or www.myshop.com
Click Save Domain. The IP Address will appear. You will need that information
The portal will show you the exact A records to create. Log into your domain registrar (GoDaddy, Namecheap, Cloudflare, etc.) and:
-
Find the DNS settings for your domain
-
Delete any existing A records for @ and www (if present)
-
Create the two new A records shown in your portal and Save changes
If that is your first time log in into the portal we recommend you update your password.
You need to create two A records at your domain registrar:
Type: A / Name: @
Value: Your server IP (e.g., 123.45.67.89) - the IP address shows up when you add your domain in the portal and click save.
TTL: 3600
Type: A / Name: www
Value:
Your server IP
TTL: 3600
You must include both @ and www. Example for domain myshop.com:
-
myshop.com → Points to server IP
-
www.myshop.com → Points to server IP
Common Registrar Locations:
-
GoDaddy: My Products → Domain → DNS
-
Namecheap: Domain List → Manage → Advanced DNS
-
Cloudflare: DNS → Records
-
Google Domains: DNS → Custom records
DNS Propagation Time
DNS changes take time to spread across the internet:
-
Typical: 10-15 minutes
-
Maximum: Up to 48 hours (rare)
During propagation:
-
Your subdomain (yourstore.djangify.com) continues working normally
-
Some visitors may see old DNS, others may see new DNS
-
SSL certificate issuance waits for full propagation
Verification & Activation
After DNS Propagates (5-10 minutes):
-
Click Verify & Activate in your portal
-
The system will:
-
Confirm DNS points to our server
-
Configure automatic HTTPS (SSL certificate)
-
Switch your custom domain live
Status Messages:
"Domain is live with HTTPS!"
Your domain is working with secure HTTPS. Both yourdomain.com and www.yourdomain.com work.
❌ "DNS does not resolve to [IP]"
DNS not propagated yet. Wait 10-30 minutes and try again.
⚠️ "SSL pending"
Domain connected but SSL certificate still processing. This usually resolves within 5 minutes.
SSL Certificates (HTTPS)
Automatic: SSL certificates are issued automatically by our server (Let's Encrypt via Caddy).
No action needed - once DNS is verified, HTTPS activates within minutes.
If SSL shows as "pending" after 30 minutes, click Retry SSL in your portal.
Troubleshooting
"DNS not resolving" - Check:
1. Verify A records:
Test DNS propagation at whatsmydns.net
Both should return the server IP shown in your portal.
2. Clear DNS cache:
-
Windows: Run ipconfig /flushdns in Command Prompt
-
Mac: Run sudo dscacheutil -flushcache in Terminal
-
Browser: Use incognito/private mode
3. Wait longer: Some DNS providers take 2-6 hours to propagate globally.
"SSL certificate failed" - Try:
-
Click Retry SSL in portal
-
Wait 5 minutes
-
If still failing after 3 attempts, contact support
Note: SSL cannot be issued until DNS fully propagates. Ensure nslookup returns correct IP first.
Both domain and www work but redirect wrong
This shouldn't happen with proper setup. If you experience redirects:
-
Clear browser cache
-
Try incognito/private window
-
Check if old DNS is cached (see DNS cache clearing above)
Common Registrar-Specific Notes
Cloudflare Users:
-
Turn OFF the orange cloud (proxy) for both A records
-
Leave as "DNS only" (grey cloud)
-
Cloudflare's proxy interferes with SSL issuance
Namecheap Users:
-
Host Record @ = root domain
-
Host Record www = www subdomain
-
Record Type must be A Record
GoDaddy Users:
-
Use @ for root domain (not blank)
-
TTL can be left as default (1 hour)
What Happens to My Subdomain?
Your original yourstore.djangify.com subdomain:
-
Remains active even with custom domain connected
-
Redirects to your custom domain automatically
-
Can be restored by removing custom domain in portal
Removing Your Custom Domain
-
Portal → Custom Domain → Remove Domain
-
Your subdomain will resume serving your store directly
-
DNS records can be deleted at your registrar (optional)
Support/Get Help
Before contacting support, please check:
-
DNS records match exactly (use nslookup)
-
You've waited at least 30 minutes since DNS changes
-
You've tried verification 2-3 times
Need help? Complete the contact form inside the dashboard area with:
-
Your domain name
-
Screenshot of your DNS records
-
Results of whatsmydns.net
Changing Your Admin Password
It's recommended to update your admin password after initial setup, especially if you received temporary credentials.
Method 1: Through the Dashboard
Log in to your admin dashboard Click your email address in the top right Select "Change password" Enter your current password Enter and confirm your new password Click "Change my password"
Method 2: Password Reset Email
If you've forgotten your password:
Go to your store's login page: https://yourdomain.com/accounts/login/ Click "Forgot Password?" Enter your admin email address Check your email for the reset link Click the link and set a new password
Note: Email must be configured for password reset to work. See the Email Configuration guide.
Common DNS Configurations
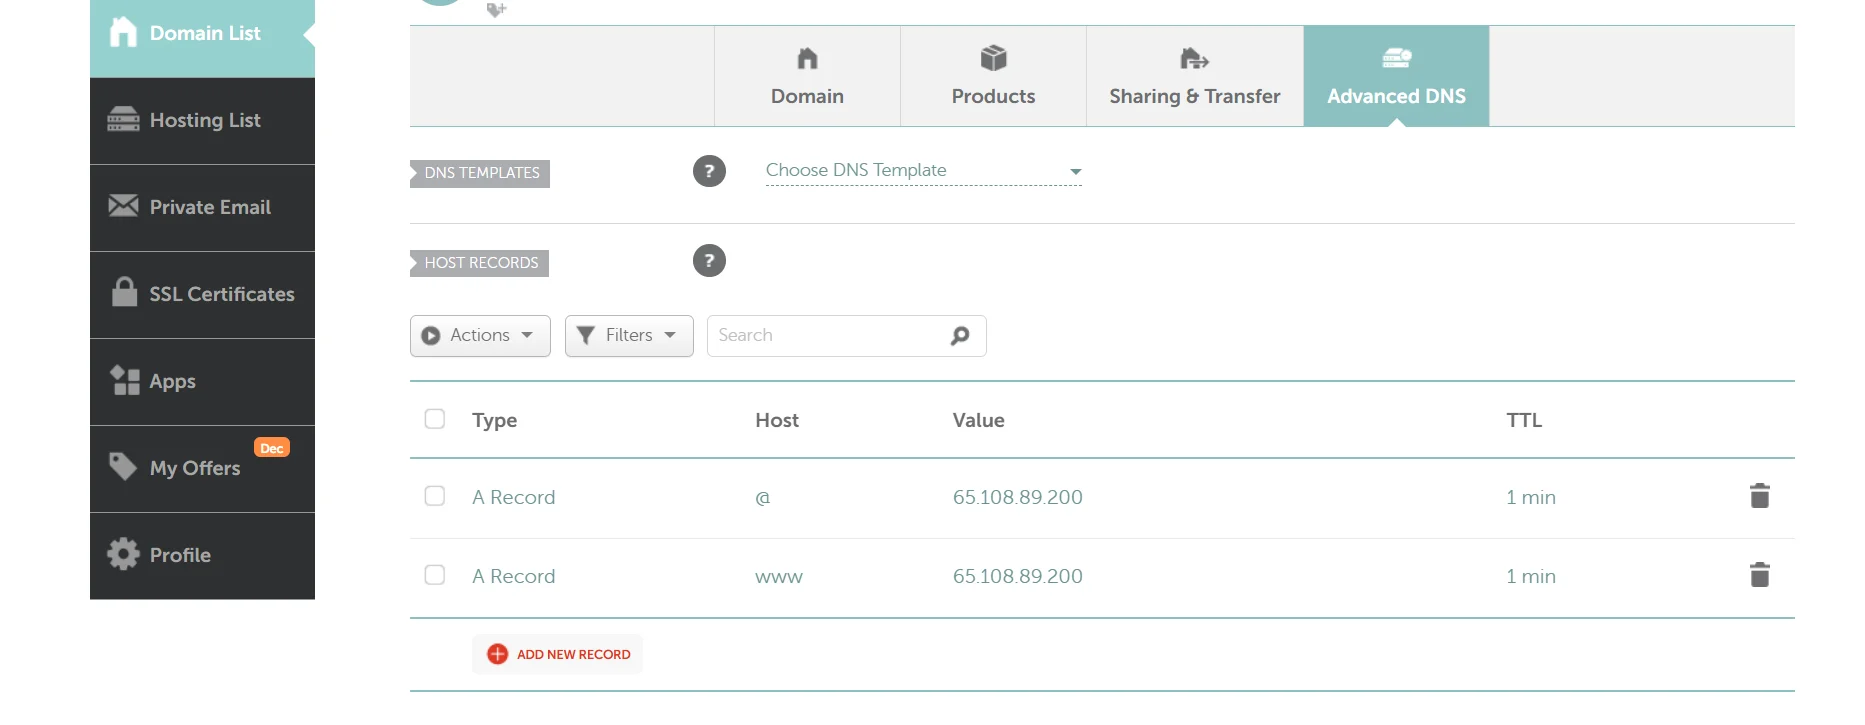
NameCheap
- Log in to NameCheap Navigate to Domain List > Manage
- Select Advanced DNS tab
- Add A Records as specified above
GoDaddy
- Log in to GoDaddy My Products > DNS >
- Manage Zones
- Select your domain
- Add A Records as specified above
Cloudflare
- Log in to Cloudflare Select your domain DNS tab > Add Record
- Add A Records with Proxy Status: Proxied (orange cloud)