Managed Sites and Self-Hosted
This article explains the admin area and how to get comfortable managing your own eCommerce builder site.
Access Your Dashboard
When you registered you will have received:
-
Login Details: contains your admin URL (example:
yourdomain.com/admin/) and your password - you should change your password after logging in for the first time. -
Portal Login Details: at my.djangify.com - this is the place to go to set up your custom domain and manage your subscription.llows you to create your own. You should change the password after logging in for the first time.
Click the link to login to the Django Admin Dashboard. You are now inside your private area where products, orders, and pages are managed. It is recommended that you change your password.
Familiarise Yourself with the Dashboard
After logging in, you will see a clean menu on the left.
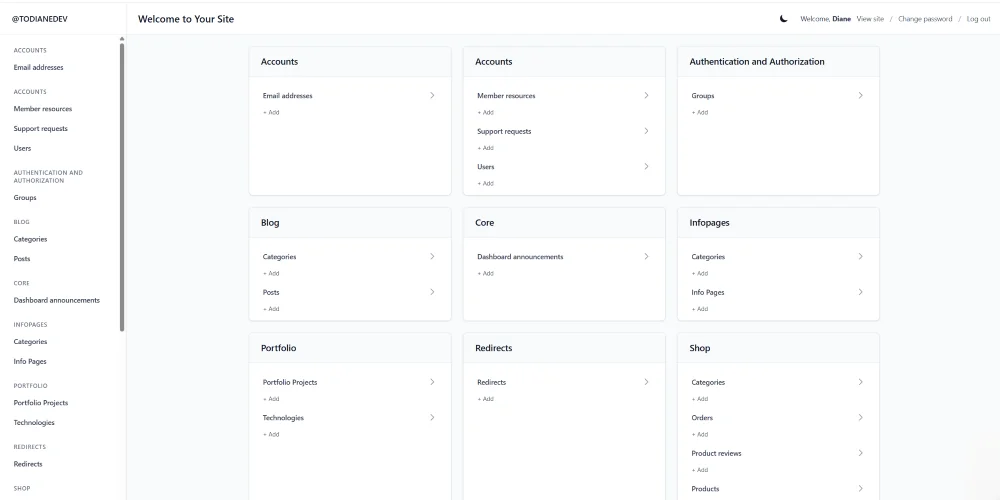
The admin dashboard area is listed alphabetically
- Accounts - User profiles and free member resources
- Authentication - User details
- Blog (if you have one)
- Core - Home Page and dashboard settings
- Shop - Your products
- Sites - you can ignore this section as it is set up for you. It simply contains your chosen domain name
Each section is grouped logically:
-
Products: manage what you sell.
-
Orders: view who bought and when.
-
Files: upload and replace digital downloads.
-
Info Pages: edit About, Contact, and Policies.
-
Core: contains site settings information including site content, social media links etc
Take five minutes to click through each area. Nothing you open will publish changes until you press Save.
Understanding the Layout
When you log in, you will see:
-
Left Sidebar: lists everything you can manage — Products, Orders, Info Pages, and so on.
-
Main Panel: shows what is inside the section you clicked.
-
Top Bar: gives you quick access to your profile, password change, and logout. The moon toggle lets you use the dark theme version.
The dashboard works like a simple table: click to open, click again to edit, click Save to apply changes.
Review Your Default Setup
Your site has been delivered with
- Example policy pages (Privacy, Terms etc). These are not complete (not applicable you purchased a custom build) and you should update them with your business information.
- Ability to connect the payment gateway via Stripe.
- A dummy product. One fake product you can remove or edit
- Secure download system for digital files.
- Click on the moon symbol to change to dark theme
Make Your First Update
- Go to InfoPages → You will see the list of generic policies
- Click on the link and the page will open.
- Replace the text that you want to amend with your new text.
- Click Save and then visit your public site (top right of the page on the right is a View On Site button) to see your update.
You have now made your first live change.
Bookmark Key Links
Keep these links handy:
Admin Dashboard: yourdomain.com/admin/
Portal: my.djangify.com
Public Storefront: yourdomain.com/ or yourstore.djangify.com/
Store them in your browser bookmarks or a password manager.
Explore Safely
You cannot “break” your site by clicking around so feel free to open and close pages. Just remember to hit save if you make any changes you want to keep.
Staff Only Area
Under Authentication. The Groups section is an Admin-only section.
This section is part of Django’s built-in authentication system. It allows the site administrator to create permission groups for internal team members (e.g., staff who manage orders or edit content).
It’s not used for customers or store owners in the standard setup and can safely be ignored unless you’re assigning admin roles. For example if you have someone adding content for you, then you might want to assign them with a role of being able to add blog posts only and not be able to add new products. Or if you have someone adding products you may want to assign them with access to the Products area only. This helps if, for example, you have a Virtual Assistant working for you and you don't want them to have full access to the site.
Logging Out Safely
Always click Log out from the top-right corner when finished.
This ensures your admin session closes and no one else can access your account from your computer.
Quick Checklist
☑ Update your password
☑ Log in to the dashboard
☑ Familiarise yourself with each section
☑ Edit information on a policy page (optional)
☑ Bookmark important links
☑ Assign specific roles if necessary by creating groups